OS X Yosemite MAMP homebrew Development Setup
Update:
A quick update, this was originally written for Yosemite Beta 1, XCode 6 Beta, and PHP56 RC1. Now that the official versions of all those are out, a lot of this post is unnecessary because, well, stable software is much more… stable. Who knew? Anyways, here’s a tl;dr for the stable version:
# Install Homebrew
xcode-select --install
ruby -e "$(curl -fsSL https://raw.githubusercontent.com/Homebrew/install/master/install)"
brew doctor
# Tap Repos
brew tap homebrew/dupes
brew tap homebrew/versions
brew tap homebrew/homebrew-php
brew tap homebrew/apache
# Verify
brew update && brew upgrade
# Macintosh
brew install git
brew install openssl
ssh-keygen -t rsa -C "email@address.invalid"
ssh-add ~/.ssh/id_rsa
# Apache
sudo apachectl stop
sudo launchctl unload -w /System/Library/LaunchDaemons/org.apache.httpd.plist 2>/dev/null
brew install httpd24 --with-privileged-ports --with-brewed-ssl
sudo cp -v /usr/local/Cellar/httpd24/2.4.10/homebrew.mxcl.httpd24.plist /Library/LaunchDaemons
sudo chown -v root:wheel /Library/LaunchDaemons/homebrew.mxcl.httpd24.plist
sudo chmod -v 644 /Library/LaunchDaemons/homebrew.mxcl.httpd24.plist
sudo launchctl load /Library/LaunchDaemons/homebrew.mxcl.httpd24.plist
sudo httpd -k start
# MySQL
brew install mysql
ln -sfv /usr/local/opt/mysql/*.plist ~/Library/LaunchAgents
launchctl load ~/Library/LaunchAgents/homebrew.mxcl.mysql.plist
mysqladmin -u root password "NEWPASSWORD"
# PHP
brew install php56 --homebrew-apxs --with-apache --with-homebrew-curl --with-homebrew-openssl --with-phpdbg --with-tidy --without-snmp
chmod -R ug+w /usr/local/Cellar/php56/5.6.2/lib/php
pear config-set php_ini /usr/local/etc/php/5.6/php.ini
printf '\nAddHandler php5-script .php\nAddType text/html .php' >> /usr/local/etc/apache2/2.4/httpd.conf
perl -p -i -e 's/DirectoryIndex /DirectoryIndex index.php /g' /usr/local/etc/apache2/2.4/httpd.conf
printf '\nexport PATH="$(brew --prefix homebrew/php/php56)/bin:$PATH"' >> ~/.profile
# Dev Stuff
brew install composer
brew install behat
brew install node
npm -g install grunt
npm -g install shifter
brew tap danpoltawski/homebrew-mdk
brew install moodle-sdk
Original Post:
It’s that time of the year again. Apple will soon release a "new" OS (10.10 Yosemite) and in celebration I’ll format my hard drive and reinstall from scratch and then slowly start reconfiguring my machine for development purposes. So I figured, if I’m going to do it- I might as well document it too. Because, to be honest, I kinda forget what I’ve done… Over a few posts we will look at every step of setting up a Moodle development machine from services configuration through installing Moodle and we’ll document all the tools and commands that are needed along the way. In part one we’ll go over installing Homebrew, git, Apache, MySQL, and PHP. In part two we’ll go over configuring Apache, MySQL, and git, as well as how to use the MDK, git, and JIRA to contribute your code. This post is good for any developer that’s using PHP- not just Moodle. So if you want to set up a Mac to develop in WordPress, Drupal, or whatever- this will get you started.
Starting Point
Sorry, we won’t be starting with the unboxing of a new Mac, because I didn’t have a $2,000 budget for this post. And in fact we won’t even be starting with the OS setup, which is OK because if you’re using 10.7 or newer, then you’re okay. If you’re still running 10.6 I’m going to assume that it’s because Apple locked you out of updates because your machine is too old, jerks. Do yourself a favor, buy a new PC.
Here’s what you’ll need: Internet access (how are you even reading this?), administrative privileges (the account doesn’t have to be admin), and accounts at a couple of websites (or the ability to sign up). I’ll also need your credit card number and the last four digits of your social security number, just leave them in the comments. Just kidding, don’t.
MAPP? MAMP? Meh.
If you spend any amount of time in the Moodle forums you’ll run across all kinds of cool acronyms. Usually the glossary auto-linker will fill your head with some cool new knowledge, but for the sake of thoroughness we’ll go over a few of them here. You may see people talk about their WAMP or MAMP or LAMP server. Generally this describes their server configuration.
If somebody says they’re using WAMP that means that their server is running on "Windows". Lamp would be "Linux" and MAMP – Mac. Though technically it should be "OS X" but OAMP is hard to say. Generally most web softwares don’t need a specific platform to run on, a website can run on any operating system. Generally. Stupid ASP.
The second letter, "A", which in the examples above is consistent means that the web service running on the server is "Apache". There are a variety of web service applications available including IIS, Nginx, lighttpd. Generally the software (i.e. Moodle) doesn’t mandate a specific web server software either. Now it could be that the software (i.e. Moodle) depends on some other software (i.e. PHP) that is not compatible or available on that web server. But again, this isn’t usually a problem.
The Third letter defines the database type. Moodle supports 4 different databases out of the box: MySQL, PostgreSQL, Oracle, and MSSQL. Because Moodle has a sweet database driver ($DB) the database that you use doesn’t really matter- in terms of developing on your machine. If you’re trying to pick a database for a large, live server, it probably does matter. So if you see LAMP, MySQL or LAPP, PostgreSQL. Users of other DB types aren’t so clever so they’ll just say boring stuff like "I’m using Windows Server 2008 RC2 with IIS 7 and MSSQL." instead of WS08RC2IIS7MSSQLFTW, which in my opinion is cooler AND easier to understand.
Finally, the last "P" stands for "PHP" which stands for "PHP Hypertext Preprocessor" which stands for "PHP Hypertext Preprocessor Hypertext Preprocessor" which stands for "All work and no play makes Jack a dull boy." Anyways… You’ll need this. Moodle won’t run with out it, and without a specific version as mentioned in the release notes of the Moodle version you download.
With so many options, how do you choose? Like I said in the title, "Meh". I’m going to assume you’re developing on a Mac, so that rules out Windows and Linux. Apache is by far the most popular web server and is included with OS X. MSSQL and Oracle don’t run on OS X. You need PHP.
So your only real options are MySQL or PostgreSQL, and we’ll cover that in a bit, but first let’s start with "M".
Macintosh (OS X)
We need to do a bit of configuring of our Mac before we dive into setting up services. Mostly this will involve downloading some applications.
Get git
Moodle development is managed using git. git in a nutshell lets you track changes of code from lots of users. If you’re going to be doing Moodle development you MUST use git. Fortunately OS X comes with git included, but you can’t use it. Open up terminal and enter the following command:
which git; git -versionand you’ll end up with a return something like this
which git
/usr/bin/git
git -version
xcode-select: note: no developer tools were found at '/Applications/Xcode.app', requesting install. Choose an option in the dialog to download the command line developer tools.
with a prompt to download XCode command line tools:
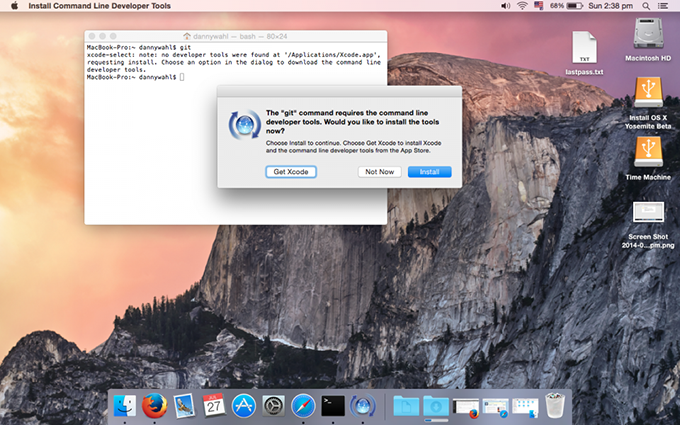
Go ahead and download it. It’s also worth it to install Xcode as well. For this post you will need both Xcode 5 which you can download from the Apple Developer site and the Xcode 6 beta. I recommend that you rename Xcode 5 from "xcode.app" to "xcode5.app" and Xcode 6 from "Xcode-beta.app" to "Xcode.app" because most of our toolchain will be using the utilities in Xcode 6. Once Xcode and the command line tools are installed we can now use the version of git included with OS X- however it’s a little dated, and we’re going to install a newer version of git from somewhere else.
When it comes to installing the git binary we have a few different choices. First, we can install the official git version from git-scm.com, second we can install a bundled version of git with a different application like github for Mac or git-tower (both of which we’ll go over later), or third you can use a third-party package manager to install a copy of git for you. This last option is the one we will be using.
Homebrew
Homebrew is self-styled "The missing package manager for OS X" and they really deliver. If you’ve spent any amount of time working on an actual Unix or Linux machine you probably both appreciate OS X’s "Unix roots" and really dislike what Apple has chosen to trim back. Without a package manager like pac-man, apt, or the like, OS X is really limited. Homebrew solves that in a really elegant way, so let’s install it. Open up terminal and copy and paste this single command:
ruby -e "$(curl -fsSL https://raw.github.com/Homebrew/homebrew/go/install)"This command has three requirements, one you need to have administrator access
or you’ll not be able to install the program as the /usr/ directory is
protected. Two you’ll need internet access as the command downloads the script
from github and then passes it to ruby to run. If you don’t have internet access
you’ll see an error like this:
ruby -e "$(curl -fsSL https://raw.github.com/Homebrew/homebrew/go/install)"
curl: (6) Could not resolve host: raw.github.com
Three, you will need to have the XCode command line utilities installed. You should have already install them. If you don’t have the command line tools installed then you will be prompted to install them:
==> Installing the Command Line Tools (expect a GUI popup):
==> /usr/bin/sudo /usr/bin/xcode-select --install
xcode-select: note: install requested for command line developer tools Press any key when the installation has completed.
After that you should be good to go. Just run brew doctor as recommended to
make sure everything’s okay.
ruby -e "$(curl -fsSL https://raw.github.com/Homebrew/homebrew/go/install)"
==> This script will install:
/usr/local/bin/brew /usr/local/Library/...
/usr/local/share/man/man1/brew.1
Press RETURN to continue or any other key to abort
==> /usr/bin/sudo /bin/mkdir /usr/local
WARNING: Improper use of the sudo command could lead to data loss or the deletion of important system files. Please double-check your typing when using sudo. Type "man sudo" for more information. To proceed, enter your password, or type Ctrl-C to abort.
Password:
==> /usr/bin/sudo /bin/chmod g+rwx /usr/local
==> /usr/bin/sudo /usr/bin/chgrp admin /usr/local
==> /usr/bin/sudo /bin/mkdir /Library/Caches/Homebrew
==> /usr/bin/sudo /bin/chmod g+rwx /Library/Caches/Homebrew
==> Downloading and installing Homebrew...
remote: Counting objects: 188543, done.
remote: Compressing objects: 100% (51551/51551), done.
remote: Total 188543 (delta 135844), reused 188510 (delta 135819)
Receiving objects: 100% (188543/188543), 37.53 MiB | 395.00 KiB/s, done.
Resolving deltas: 100% (135844/135844), done.
From https://github.com/Homebrew/homebrew * [new branch] master -> origin/master HEAD is now at 881c231 Fix up dep directories before activating ENV extensions
==> Installation successful!
==> Next steps Run `brew doctor` before you install anything Run `brew help` to get started
brew doctor
Your system is ready to brew.
If you see "Your system is ready to brew." then we can move on to the next step.
At this point you do have OS X’s version of git installed. To see your specific
version run git --version in terminal:
git --version git version 1.9.3 (Apple Git-50)That’s the version on my system, which is the bleeding-edge version of git that Apple is shipping on a beta operating system and according to github releases, it was released (at time of this writing) about two and a half months ago. Not to mention it’s a full major release behind. git-scm.com has the latest version of git available as 2.0.3. I like to be a little more up to date than that. If we search the homebrew repository we can see the latest version available is 2.0.2:
brew search git
bagit           git-extras      git-number      giter8
bash-git-prompt git-flow        git-open        gitfs
easy-git        git-flow-avh    git-review      github-release
geogit          git-flow-clone  git-sh          gitslave
git             git-ftp         git-ssh         legit
git-annex       git-gerrit      git-tf          libgit2
git-archive-all git-imerge      git-tf-2.0.2    libgit2-glib
git-cal         git-integration git-tig         magit
git-cola        git-latexdiff   git-tracker     stgit
git-crypt       git-multipush   git-url-sub     topgit
git-encrypt     git-now         gitbucket
At the time of this writing 2.0.2 is only 13 days old and 2.0.3 is only 5 days
old. That’s a much better timeframe for updating. So let’s install the homebrew
version of git using brew install git
brew install git
==> Downloading https://www.kernel.org/pub/software/scm/git/git-2.0.3.tar.gz
######################################################################## 100.0%
==> make prefix=/usr/local/Cellar/git/2.0.3 sysconfdir=/usr/local/etc CC=clang C
==> make CC=clang CFLAGS= LDFLAGS= ==> make clean ==> make CC=clang CFLAGS= LDFLAGS=
==> Downloading https://www.kernel.org/pub/software/scm/git/git-manpages-2.0.3.t
######################################################################## 100.0%
==> Downloading https://www.kernel.org/pub/software/scm/git/git-htmldocs-2.0.3.t
######################################################################## 100.0%
==> Caveats The OS X keychain credential helper has been installed to:
/usr/local/bin/git-credential-osxkeychain
The 'contrib' directory has been installed to:
/usr/local/share/git-core/contrib
Bash completion has been installed to:
/usr/local/etc/bash_completion.d
zsh completion has been installed to:
/usr/local/share/zsh/site-functions
==> Summary /usr/local/Cellar/git/2.0.3: 1328 files, 31M, built in 69 seconds
So you’ll see a couple of things- first we actually installed 2.0.3 and that’s because homebrew isn’t a repository of binaries, it simply manages them, the install actually comes from the main git repository at git-scm (kernel.org). In addition to the vanilla git binary we also get bash completion and man pages. Sweet! Go ahead and check the version again, you may have to quit your terminal session and start a new one.
dannywahlmbp:~ dannywahl$ git --version git version 2.0.3That’s pretty much it for git, now we can move on to github, where we’ll be managing our source code.
Github
Github is where all the cool kids are storing their code these days. Well, everybody except Moodle and Mahara. But at least they provide copies of their work at github- Moodle at least, I didn’t check Mahara (too lazy to open a new tab…).
Basically Github is "the cloud" for source code versioning. You create a repository there, "clone" it to your machine, edit, and push your changes back to the server. If you’re new to git there are lots of resources available to you. We’ll cover a few basics in this post but mastering it is beyond the scope. I suggest you check out:
- Learn Version Control With Git
- Git –local-branching-on-the-cheap
- Code School – Try Git
- Git Tutorials
Sorry, that list isn’t nearly as fun as anything Buzzfeed has put together, and full disclosure- I learned git just by Moodle development so I can’t vouch for any of the above resources… (then why did I even recommend them? Stupid!) Anyways…
If you do not already have an account at github you will need to go sign up. Once you’ve cleared the hoops of verifying email, etc… log in. Github should provide you with a nice step-by-step tutorial of setting up you Mac. But we’ll do it again, just to be sure!
Log in and head over to your profile, fill in any info you want and then click on the SSH Keys tab on the left. SSH basically lets you securely communicate with the server where you are storing your code. Right now we’ll go through the process of generating an SSH key and storing it on github.
Check for existing SSH Keys
Open Terminal again, now if you’re on a fresh OS install you won’t have to do this but you can. Type the following command:
ls -lsa ~/.sshls is the command to ‘list’ everything in a directory. ~ is short code for
your home folder, on a Mac that’s /Users/UserName (by default). / is a folder
inside of your home folder. .ssh is the name of the folder. On Unix systems a
folder that starts with a ‘.’ will be hidden- no need for
chflags! So we’ve put together a command
that says "show the contents of the hidden folder ‘.ssh’ inside of my home
folder". And that is probably shockingly similar to the AppleScript that you
would use to do that too.
If terminal gives you this return:
ls -lsa ~/.ssh ls: /Users/dannywahl/.ssh: No such file or directorythen we need to create the directory with another command (just copy and paste):
mkdir ~/.ssh; chmod 700 ~/.sshThis will do two things, create the ssh directory, and then make sure only you can access it. You can learn more about Unix permissions here.
If terminal gives you this return:
ls -lsa ~/.ssh/
total 16
0 drwx------ 4 dannywahl staff 136 Jul 31 16:41 .
0 drwxr-xr-x+ 18 dannywahl staff 612 Jul 31 16:36 ..
8 -rw------- 1 dannywahl staff 1766 Jul 31 16:41 id_rsa
8 -rw-r--r-- 1 dannywahl staff 398 Jul 31 16:41 id_rsa.pub
Then you already have an SSH Key. IF you created this key and are sure of its security you can use it with github, skip to the "Adding your SSH Key to Github" section below. Otherwise you can create a new one.
Creating an SSH Key Pair
When you create an SSH key you actually create two keys, a private key and a public key. You keep the private key and you can share the public key with others. This allows them to receive messages and ensure it is from you, but they can’t pretend to be you and send out messages on your behalf. Back in terminal we’re going to create a new RSA SSH key set. Run the command:
ssh-keygen -t rsa -C "email@address.invalid"This will kick off a "Wizard" of sorts and walk you through creating your key pair. First you need to specify where to save the new keys, the default is your ~/.ssh folder, so just push enter.
Generating public/private rsa key pair.
Enter file in which to save the key (/Users/dannywahl/.ssh/id_rsa):
Note that you can specify a different name, as you can have multiple SSH key pairs. Though for most instances a single pair is all that is necessary.
Next it will ask you for a key passphrase, which is optional. I strongly suggest that you add a passphrase for both added security and the fact that other SSH applications (not github) require a passphrase to function properly and if you want to reuse your key pair you will need a passphrase. Type your passphrase press Enter and type it again to make sure it matches.
Enter passphrase (empty for no passphrase):
Enter same passphrase again:
After that your key pair will be save and you will be given some information about it. It will look something like this:
Your identification has been saved in /Users/dannywahl/.ssh/id_rsa.
Your public key has been saved in /Users/dannywahl/.ssh/id_rsa.pub.
The key fingerprint is:
fa:e7:5c:f2:60:d8:ad:44:3c:a4:07:0d:b5:09:77:9f
danny@iyware.com
The key's randomart image is:
+--[ RSA 2048]----+
| =A+ . | | *=* . |
| +.=oE . | | . o=
= | | .S . | | . |
| | | | | |
+-----------------+
The finger print and randomart allow you to verify that a public key copy is a real copy. Please note that these are NOT my real public key credentials. On that note you should NEVER share your private key with anyone.
Activating Your Key
Now that you have created your key you need to tell the operating system to use
it. We will use the ssh-add command to load your key. Enter this command, and
then type your key passphrase. If you didn’t enter a passphrase, simply press
Enter.
ssh-add ~/.ssh/id_rsa
Enter passphrase for /Users/dannywahl/.ssh/id_rsa:
Identity added: /Users/dannywahl/.ssh/id_rsa (/Users/dannywahl/.ssh/id_rsa)
Copy Your Public Key to Github
The final step is to give github a copy of your public key. If you don’t have the SSH Keys page open you will need to navigate there and click "Add SSH Keys". You can store more than one key with github, which is useful if you have multiple devices that you do development from.
Back in terminal you have one more command to run, simply copy and paste (unless you renamed your key):
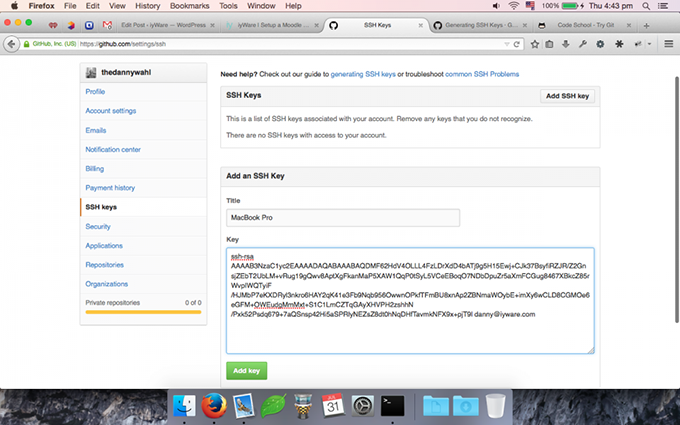
pbcopy < ~/.ssh/id_rsa.pubThis command copies the contents of your public key to your clipboard. You can also open your key in a text editor and copy the contents but this command prevents both omitting a character and accidentally editing the key. Switch back to github and paste in the "Key" field. If there’s a blank line at the end, that’s ok- don’t erase it. Remember we want the contents of the key exactly.
You’ll want to give you key a title so that if you ever have a security issue at github you can see exactly which machine accessed or changed which repositories. Your page should look something like this:
Click the "Add key" button and you’ll be taken back to the SSH Keys page, where your new key will be listed. If you look at terminal you’ll notice that the fingerprints match.
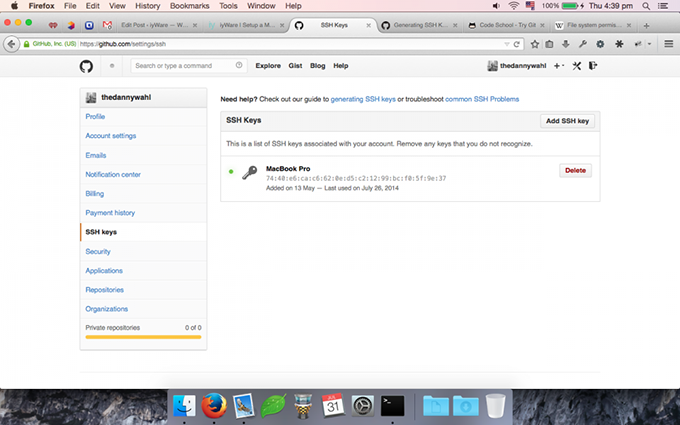
For now we’re done with github. So far we’ve set up homebrew, installed git, created an SSH key pair, and added a copy of our public key to github. Next we’ll start setting up the "server" side of our development machine, starting with Apache.
Apache
The Apache HTTPD server is the most popular web server in the world. And in fact Apache is included with OS X by default. Just copy and paste this command into terminal:
apachectl -vMine says:
Server version: Apache/2.4.9 (Unix) Server built: Jun 28 2014 12:11:10Which is actually not that bad. Apache is one of those softwares that updates rather slowly, 2.4.10 was released on July 10th. Since Apache is included in OS X we can just use that right? Sure, just visit this link: http://localhost. Oops, does your screen look something like this?

That’s because even though Apache is included in OS X it’s off by default. We have a few options available that we’ll look at to enabling Apache.
The Apple Way
Even though Apple includes Apache as a part of OS X, and they used to include an option to enable it in the "Sharing" pane of System preferences, the preferred way to enable Apache on OS X since 10.7 is to buy the Server app from the App Store. That’s right, for only $19 Apple will sell you a button that starts Apache.
The Poor Man’s Way
The second option is to simply start Apache ourselves. Go to terminal and type this command:
sudo apachectl startAfter you type your password head back to http://localhost and it should look more like this:
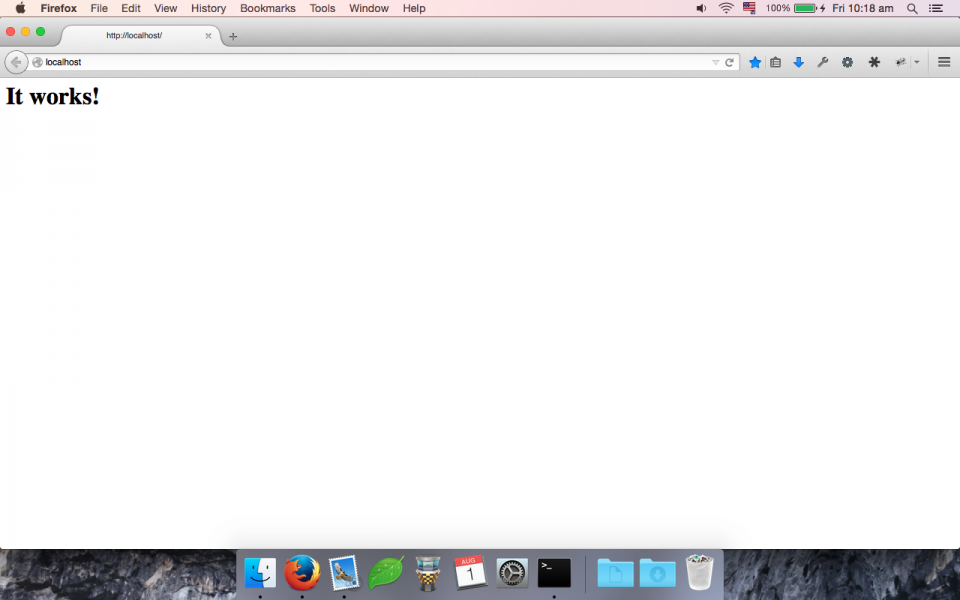
$20 bucks for that. To be fair to Apple, Server does give you lots of other functionality but for our purposes they’re not really necessary. Kind of like installing XCode to use git. Now, I’m going to recommend that you actually stop the Apache service because we are not going to use the built in version that Apple ships with.
sudo apachectl stopThe Homebrew Way
The reason we’re not going to use the version that ships with Apple is because they do a TON of customization to the Apache configurations and it makes it really difficult to simply add a vhost or edit a config. You even have to mess with groups to allow yourself to change files in your ~/Sites folder. Instead we’re going to install Apache via Homebrew and it will run entirely within your home folder.
First we need to unload the OS X version of Apache which is loaded on the machine at startup, but "stopped". Copy and paste this into terminal.
sudo launchctl unload -w /System/Library/LaunchDaemons/org.apache.httpd.plist 2>/dev/nullNext we need to do is add the Apache repository to the list of repositories that Homebrew tracks, as it is not included by default.
brew tap homebrew/apacheand you’ll see that the repository is downloaded and 9 new forumlae are available for install.
brew tap homebrew/apache
Cloning into '/usr/local/Library/Taps/homebrew/homebrew-apache'...
remote: Counting objects: 241, done.
remote: Total 241 (delta 0), reused 0 (delta 0)
Receiving objects: 100% (241/241), 45.55 KiB | 39.00 KiB/s, done.
Resolving deltas: 100% (130/130), done.
Checking connectivity... done.
Tapped 9 formulae
The new repository gives us two versions of Apache: 2.2 and 2.4. For our development we will be installing Apache 2.4, however when we try we end up with an error:
brew install httpd24
Error: No available formula for apr (dependency of httpd24)
Searching taps...
homebrew/dupes/apr-util homebrew/dupes/apr homebrew/science/reapr
it seems that Apache 2.4 requires another app called ‘apr’ that isn’t on our system. Fortunately Homebrew does us a favor and tells us where to find it and it’s available in another repository, so we need to add that to our list of available repositories like before:
brew tap homebrew/dupesAccording to the ‘dupes’ repository,
These formulae duplicate software provided by OS X, though may provide more recent or bugfix versions.
Now what’s nice is that homebrew will resolve dependencies for us now that it knows where the files are, so let’s try again:
brew install httpd24 –with-privileged-portshttpd24 will get us the current version of Apache 2.4. The
‘with-privileged-ports’ parameter tells Apache to run on port 80/443 instead of
8080/8443. Essentially this means you can visit
http://localhost instead of having to type
http://localhost:8080. 80 and 443 are the default
ports that all websites run on and for our development purposes are preferable.
If you get an error during compiling please follow the instructions of the output. If you have installed a beta version of Xcode on your machine please do NOT open an issue with the Homebrew people (like this one). Instead head over to the App Store and redownload the old version. If the app store won’t let you download you can go to the Apple Developer Downloads page and download the latest stable version of Xcode to your machine. You don’t have to remove the beta version, but the stable needs to be named ‘Xcode.app’.
Error: Homebrew doesn't know what compiler versions ship with your version of Xcode (6.0).
Please `brew update` and if that doesn't help, file an issue with the output of `brew --config`:
https://github.com/Homebrew/homebrew/issues
Note that we only track stable, released versions of Xcode. Thanks!
READ THIS:
https://github.com/Homebrew/homebrew/wiki/troubleshooting
If reporting this issue please do so at (not Homebrew/homebrew):
https://github.com/homebrew/homebrew-apache/issues
Another issue I ran into was a configure failure because zlib couldn’t be found:
brew install httpd24 --with-privileged-ports
==> Downloading https://archive.apache.org/dist/httpd/httpd-2.4.10.tar.bz2
Already downloaded: /Library/Caches/Homebrew/httpd24-2.4.10.tar.bz2
==> ./configure --enable-layout=Homebrew --enable-mods-shared=all --with-mpm=pre
checking whether to enable mod_sed... shared (all) checking whether to enable mod_charset_lite... shared (all)
checking whether to enable mod_deflate...
checking dependencies
checking for zlib location... not found
checking whether to enable mod_deflate...
configure: error: mod_deflate has been requested but can not be built due to prerequisite failures
READ THIS:
https://github.com/Homebrew/homebrew/wiki/troubleshooting If reporting this issue please do so at (not Homebrew/homebrew):
https://github.com/homebrew/homebrew-apache/issues
This is probably a result of using a beta version of the Xcode command line tools, but there’s a simple fix that’s been reported. First you need to install zlib in Homebrew from the dupes repository.
brew install zlibHomebrew will give you this caveat:
==> Caveats
This formula is keg-only, so it was not symlinked into /usr/local.
Mac OS X already provides this software and installing another version in parallel can cause all kinds of trouble.
Generally there are no consequences of this for you.
If you build your own software and it requires this formula, you'll need to add to your build variables:
LDFLAGS: -L/usr/local/opt/zlib/lib
CPPFLAGS: -I/usr/local/opt/zlib/include
Which basically means that you need to manually use that version of zlib, which is what we’ll tell our Apache build script to do now. Go back to terminal and enter the following command:
brew edit httpd24This will open the config in your default text editor. Enter this line:
args << "--with-z=/usr/local/Cellar/zlib/1.2.8"After this section:
if build.with? "privileged-ports"
  args << "--with-port=80"
  args << "--with-sslport=443"
else
  args << "--with-port=8080"
  args << "--with-sslport=8443"
end
That will add a new argument that forces it to use our Homebrew version of zlib. Save the file and run the build again:
brew install httpd24 --with-privileged-portsIf you don't have any errors then your output should look something like this:
brew install httpd24 --with-privileged-ports
==> Downloading https://archive.apache.org/dist/httpd/httpd-2.4.10.tar.bz2
Already downloaded: /Library/Caches/Homebrew/httpd24-2.4.10.tar.bz2
==> ./configure --enable-layout=Homebrew --enable-mods-shared=all --with-mpm=pre
==> make
==> make install
==> Caveats
To have launchd start httpd24 at login:
ln -sfv /usr/local/opt/httpd24/*.plist ~/Library/LaunchAgents
Then to load httpd24 now:
launchctl load ~/Library/LaunchAgents/homebrew.mxcl.httpd24.plist
==> Summary /usr/local/Cellar/httpd24/2.4.10: 199 files, 4.4M, built in 86 seconds
Finally it's important that we look at the caveats as they will tell us how to
make sure that Apache starts when we log in to the system. Since we used the
--with-privileged-ports parameter we will have to make some adjustments to the
recommendations that Homebrew provides. Their recommendation is to create a
symlink to your user LaunchAgents folder. That folder contains plists that do
certain things when you log in. However, on a Unix system lower ports like 80
require root to run. Since this launch agent is launching Apache under your
username it will quietly fail. Instead we will have the system (root) load it
for us. The biggest difference is that Apache will be loaded at system start
instead of when you log in. So go ahead and copy and paste this modified command
into terminal.
sudo ln -sfv /usr/local/opt/httpd24/*.plist /Library/LaunchDaemons;
sudo launchctl load /Library/LaunchDaemons/homebrew.mxcl.httpd24.plist
Now the next time you reboot Apache will load. But the beautiful thing about a
service is that you can start, stop, or reload it at any time- we don't need
to log out and log in again to start. Now, since we're running Apache as root we
will need to use sudo. So it's not necessary now, because we just loaded it,
but for the future you can use:
sudo httpd -k start
sudo httpd -k restart
sudo httpd -k stop
for more info you can check the manual man entry that's included with our
Apache install.
man httpdNow Apache is installed (by you) and running (as root). Go ahead and go back to http://localhost and you should see this:

By default the Apache configuration files are stored in
/usr/local/etc/apache2/2.4 and the web root is at /usr/local/var/www/htdocs.
We'll revisit further Apache configuration when we get to Moodle setup, but for
now enjoy your shiny new site!
MySQL, uhh.. PostgreSQL
The next step on setting up our MA*P server is the database. In the old, olden days of 3 years ago OS X included MySQL in OS X server. Then Apple switched to Postgres. Then Apple bundled Postgres with the OS and added an 'enable' button in the Server app (a la Apache). And now starting with OS 10.9 it's back to being bundled exclusively with the Server App. tl;dr: you need to install a database, and I figure if it's so trivial for Apple to switch databases then it doesn't really matter which one we're using, right? ;)
Ok, here's the exception, if you're planning on developing some sort of Moodle plugin, or fixing bugs that are database oriented, then you'll probably want to install multiple database drivers. But for simpler development where Moodle $DB handled the transactions, pick your poison. I'm going to use MySQL. So let's head back to the Homebrew app in terminal and get started:
brew install mysqlOk, caveat. If you happen to be on an as-of-yet-unreleased OS and have both Xcode 5 and Xcode 6 beta installed on your system you will need to use Xcode 6 to install MySQL otherwise this will happen:
brew install mysql
==> Installing dependencies for mysql: cmake, pkg-config, makedepend, ope
==> Installing mysql dependency: cmake
==> Downloading http://www.cmake.org/files/v3.0/cmake-3.0.0.tar.gz
######################################################################## 100.0%
==> ./bootstrap --prefix=/usr/local/Cellar/cmake/3.0.0 --system-libs --no-system
See also "/tmp/cmake-Lgaj/cmake-3.0.0/CMakeFiles/CMakeError.log".
---------------------------------------------
Error when bootstrapping CMake: Problem while running initial CMake
---------------------------------------------
READ THIS: https://github.com/Homebrew/homebrew/wiki/troubleshooting

These open issues may also help:
Qt5 Cmake Files Incorrect (https://github.com/Homebrew/homebrew/issues/29938)
Fix LLVM CMake modules not being preprocessed (https://github.com/Homebrew/homebrew/pull/29976)
glm: Does not install FindGLM.cmake (https://github.com/Homebrew/homebrew/issues/28403)
cmake builds fail on CLT-only with --env=std (https://github.com/Homebrew/homebrew/issues/29101)
cmake find_package(PythonLibs)
broken with brewed python on 10.9 (https://github.com/Homebrew/homebrew/issues/25118)
It's nice that they give you a log to inspect, but it's also kind of annoying that the /tmp dir gets cleaned up one it's done failing... Basically if you can capture the log in Console while it's failing you'll see that something in the Xcode tool is causing the failure. I guessed that it was because of Xcode 5 - and hey, lucky guess! So if you have that error drop into terminal and use this command:
mv /Applications/Xcode.app /Applications/Xcode5.app;
mv /Applications/Xcode6-beta4.app /Applications/Xcode.app
Or just go to the /Applications folder and rename them, your choice. Then run the install command again. When the build is done you can move your Xcode apps back to their original names. If all goes well you should end up with some terminal output like this:
brew install mysql
==> Installing dependencies for mysql: cmake, pkg-config, makedepend, ope
==> Installing mysql dependency: cmake
==> Downloading http://www.cmake.org/files/v3.0/cmake-3.0.0.tar.gz
Already downloaded: /Library/Caches/Homebrew/cmake-3.0.0.tar.gz
==> ./bootstrap --prefix=/usr/local/Cellar/cmake/3.0.0 --system-libs --no-system
==> make
==> make install /usr/local/Cellar/cmake/3.0.0: 1622 files, 25M, built in 4.1 minutes
==> Installing mysql dependency: pkg-config
==> Downloading http://pkgconfig.freedesktop.org/releases/pkg-config-0.28.tar.gz
######################################################################## 100.0%
==> ./configure --prefix=/usr/local/Cellar/pkg-config/0.28 --disable-host-tool -
==> make
==> make check
==> make install /usr/local/Cellar/pkg-config/0.28: 10 files, 608K, built in 89 seconds
==> Installing mysql dependency: makedepend
==> Downloading http://xorg.freedesktop.org/releases/individual/util/makedepend-
######################################################################## 100.0%
==> Downloading http://xorg.freedesktop.org/releases/individual/proto/xproto-7.0
######################################################################## 100.0%
==> ./configure --disable-silent-rules --prefix=/private/tmp/makedepend-xfpn/mak
==> make install
==> Downloading http://xorg.freedesktop.org/releases/individual/util/util-macros
######################################################################## 100.0%
==> ./configure --prefix=/private/tmp/makedepend-xfpn/makedepend-1.0.5/xorg-macr
==> make install
==> ./configure --disable-silent-rules --prefix=/usr/local/Cellar/makedepend/1.0
==> make install /usr/local/Cellar/makedepend/1.0.5: 7 files, 92K, built in 27 seconds
==> Installing mysql dependency: openssl
==> Downloading https://www.openssl.org/source/openssl-1.0.1h.tar.gz curl: (28) Operation timed out after 6190 milliseconds with 0 out of 0 bytes received Trying a mirror...
==> Downloading http://mirrors.ibiblio.org/openssl/source/openssl-1.0.1h.tar.gz
######################################################################## 100.0%
==> perl ./Configure --prefix=/usr/local/Cellar/openssl/1.0.1h --openssldir=/usr
==> make depend
==> make
==> make test
==> make install MANDIR=/usr/local/Cellar/openssl/1.0.1h/share/man MANSUFFIX=ssl
==> Caveats
A CA file has been bootstrapped using certificates from the system keychain.
To add additional certificates, place .pem files in
/usr/local/etc/openssl/certs
and run
/usr/local/opt/openssl/bin/c_rehash
This formula is keg-only, so it was not symlinked into /usr/local.
Mac OS X already provides this software and installing another version in parallel can cause all kinds of trouble.
The OpenSSL provided by OS X is too old for some software.
Generally there are no consequences of this for you.
If you build your own software and it requires this formula, you'll need to add to your build variables:
LDFLAGS: -L/usr/local/opt/openssl/lib
CPPFLAGS: -I/usr/local/opt/openssl/include
==> Summary /usr/local/Cellar/openssl/1.0.1h: 429 files, 15M, built in 4.1 minutes
==> Installing mysql
==> Downloading http://cdn.mysql.com/Downloads/MySQL-5.6/mysql-5.6.20.tar.gz
######################################################################## 100.0%
==> cmake . -DCMAKE_INSTALL_PREFIX=/usr/local/Cellar/mysql/5.6.20 -DCMAKE_FIND_F
==> make
==> make install
==> Caveats
A "/etc/my.cnf" from another install may interfere with a Homebrew-built server starting up correctly.
To connect:
mysql -uroot
To have launchd start mysql at login:
ln -sfv /usr/local/opt/mysql/*.plist ~/Library/LaunchAgents
Then to load mysql now:
launchctl load ~/Library/LaunchAgents/homebrew.mxcl.mysql.plist
Or, if you don't want/need launchctl, you can just run:
mysql.server start
==> /usr/local/Cellar/mysql/5.6.20/bin/mysql_install_db --verbose --user=dannywa
==> Summary /usr/local/Cellar/mysql/5.6.20: 9578 files, 339M, built in 7.2 minutes
Now that's pretty amazing to me, and where homebrew is really worth its salt.
All of those dependencies managed, auto downloaded, configured, and installed:
cmake, pkg-config, makedepend, openssl, and finally mysql. There's no way I
could have done that in 7.2 minutes manually.
Generally MySQL runs at a high enough port that it can run in user space, so you don't need to sudo it into the /Library/LaunchAgents folder, it's ok to run it from your home folder, so go ahead and follow the instruction on screen:
ln -sfv /usr/local/opt/mysql/*.plist ~/Library/LaunchAgents;
launchctl load ~/Library/LaunchAgents/homebrew.mxcl.mysql.plist
That will load MySQL. Now we'll test it and make some configuration changes. In shell we will connect to the mysql server:
mysql -u rootYou will now drop into a MySQL prompt that should look something like this:
Welcome to the MySQL monitor. Commands end with ; or \g.
Your MySQL connection id is 3
Server version: 5.6.20 Homebrew

Copyright (c) 2000, 2014, Oracle and/or its affiliates. All rights reserved.

Oracle is a registered trademark of Oracle Corporation and/or its affiliates. Other names may be trademarks of their respective owners.

Type 'help;' or '\h' for help. Type '\c' to clear the current input statement.

mysql>
Notice that we have version 5.6.20 Homebrew - helpful in identifying that we are
connected to the correct database. Now at the prompt (mysql >) we will set a
password for the root account. It's not only good practice, it's required by
some software. Obviously in a production server you would worry about security-
but for a dev server using root is A-OK in my book. To set the root password
enter this command:
exit;No, that didn't really change the root password. That simply disconnected from
the MySQL server and dropped us back into our standard shell. You see, there's a
simple command called mysqladmin that's been installed for us as well which
makes it much easier to change the password. Now we will use this command:
mysqladmin -u root password "newpwd"Please substitute "newpwd" for the password you want to use for the root account. I use "root" (no quotes). Again- it's a dev. server. Remember that the MySQL docs recommend only alphanumeric characters for MySQL passwords. If you run into log in issues later it might be because of special characters. Now, let's try to connect to mysql again as above and you should get an error:
mysql -u root ERROR 1045 (28000): Access denied for user 'root'@'localhost' (using password: NO)If you want to connect via terminal in the future you will have to use the -p
flag like so:
mysql -u root -pAfter which you will be prompted for the password which you just set.
For now that's the basic configuration of MySQL, we'll cover creating databases later when we go into Moodle setup.
PHP
PHP is one of the most popular dynamic languages out there. It's robust, it's solid, and it's what Moodle uses. So let's install it. Once again, OS X ships with PHP installed, but we're going to disable it and replace with the Homebrew version. My shipped version is 5.5.9 (cli) which was released on Feb 4, 2014. The latest stable version is 5.5.15:
php -v
PHP 5.5.9 (cli) (built: Jun 28 2014 15:59:38)
Copyright (c) 1997-2014 The PHP Group
Zend Engine v2.5.0, Copyright (c) 1998-2014 Zend Technologies
Now, before we install PHP we need to remember that Moodle requires and recommends a lot of submodules:
- php
- pcreunicode
- php_extension iconv
- php_extension mbstring
- php_extension curl
- php_extension openssl
- php_extension tokenizer
- php_extension xmlrpc
- php_extension soap
- php_extension ctype
- php_extension zip
- php_extension zlib
- php_extension gd
- php_extension simplexml
- php_extension spl
- php_extension pcre
- php_extension dom
- php_extension xml
- php_extension intl
- php_extension json
- php_extension hash
Man that's a lot of requirements/recommendations, fortunately Homebrew is going to provide us a lot of flexibility in getting everything installed. First we're going to need to tap two new repositories 'versions' and 'homebrew-php':
brew tap homebrew/versions;
brew tap homebrew/homebrew-php
If everything goes well your output should look something like this:
brew tap homebrew/versions
Cloning into '/usr/local/Library/Taps/homebrew/homebrew-versions'...
remote: Counting objects: 2274, done.
remote: Compressing objects: 100% (42/42), done.
remote: Total 2274 (delta 18), reused 4 (delta 2) Receiving objects: 100% (2274/2274), 729.39 KiB | 338.00 KiB/s, done.
Resolving deltas: 100% (1278/1278), done.
Checking connectivity... done.
Tapped 160 formulae
brew tap homebrew/homebrew-php
Cloning into '/usr/local/Library/Taps/homebrew/homebrew-php'...
remote: Counting objects: 6685, done.
remote: Compressing objects: 100% (5/5), done.
remote: Total 6685 (delta 0), reused 1 (delta 0)
Receiving objects: 100% (6685/6685), 1.32 MiB | 691.00 KiB/s, done.
Resolving deltas: 100% (4322/4322), done.
Checking connectivity... done.
Tapped 408 formulae
Next you'll need to decide which version of PHP you want. I'm going to use PHP 5.6 even though it's only at RC1 as of this writing because I really want to try phpdbg. If nobody tests release versions of software then how will the bugs be found? Let's take a look at what options are available to us by running this command:
brew options php56and we get quite a few options:
brew options php56
--disable-opcache
  Build without Opcache extension
--homebrew-apxs
  Build against apxs in Homebrew prefix
--with-apache
  Enable building of shared Apache 2.0 Handler module, overriding any options which disable apache
--with-cgi
  Enable building of the CGI executable (implies --without-apache)
--with-debug
  Compile with debugging symbols
--with-fpm
  Enable building of the fpm SAPI executable (implies --without-apache)
--with-gmp
  Build with gmp support
--with-homebrew-curl
  Include Curl support via Homebrew
--with-homebrew-libxslt
  Include LibXSLT support via Homebrew
--with-homebrew-openssl
  Include OpenSSL support via Homebrew
--with-imap Include
  IMAP extension
--with-intl
  Include internationalization support
--with-libmysql
  Include (old-style) libmysql support instead of mysqlnd
--with-mssql
  Include MSSQL-DB support
--with-pdo-oci
  Include Oracle databases (requries ORACLE_HOME be set)
--with-pgsql
  Include PostgreSQL support
--with-phpdbg
  Enable building of the phpdbg SAPI executable (PHP 5.4 and above)
--with-thread-safety
  Build with thread safety
--with-tidy
  Include Tidy support
--without-bz2
  Build without bz2 support
--without-mysql
  Remove MySQL/MariaDB support
--without-pcntl
  Build without Process Control support
--without-pear
  Build without PEAR --HEAD install HEAD version
Even though it's probably not required for php56 I'm going to use the
--with-phpdbg flag just to be safe. In addition I'm going to use a few other
options for homebrew versions of software. Since we've already installed
Homebrew OpenSSL we'll use that, as well as APXS and Curl. Apxs is a tool for
building Apache modules (like PHP) - since we're using a newer version of Apache
than shipped with OS X we should probably use a newer version of APXS too. Curl
is another one of those tools that's slightly outdated and we may as well use
the latest stable version. The version on my system is 7.30.0, and at the time
of this writing the version shipping with Homebrew is 7.37.1. I've also used
--with-tidy because if I recall correctly Moodle text editors can leverage it
for WYSIWYG input. Finally, notice that we're not using the --with-intl flag,
that's because currently intl is broken and we'll have to install a separate
package after PHP builds. Here's my full install command (copy and paste):
brew install php56 --homebrew-apxs --with-apache --with-homebrew-curl --with-homebrew-openssl --with-phpdbg --with-tidyIf you get an error about missing bzip2 like this:
==> ./configure --prefix=/usr/local/Cellar/php56/5.6.0-rc.2 --localstatedir=/usr
checking for gzgets in -lz... yes
checking whether to enable bc style precision math functions... yes
checking for BZip2 support... yes
checking for BZip2 in default path... not found
configure: error: Please reinstall the BZip2 distribution
READ THIS: https://github.com/Homebrew/homebrew/wiki/troubleshooting
If reporting this issue please do so at (not Homebrew/homebrew): https://github.com/homebrew/homebrew-php/issues
/System/Library/Frameworks/Ruby.framework/Versions/2.0/usr/lib/ruby/2.0.0/rubygems/core_ext/kernel_require.rb:55:in 'require': Class is not a module (TypeError)
from /System/Library/Frameworks/Ruby.framework/Versions/2.0/usr/lib/ruby/2.0.0/rubygems/core_ext/kernel_require.rb:55:in 'require'
from /System/Library/Frameworks/Ruby.framework/Versions/2.0/usr/lib/ruby/2.0.0/net/http.rb:390:in '<http>'
from /System/Library/Frameworks/Ruby.framework/Versions/2.0/usr/lib/ruby/2.0.0/net/http.rb:384:in '<net>'
from /System/Library/Frameworks/Ruby.framework/Versions/2.0/usr/lib/ruby/2.0.0/net/http.rb:25:in '<top>'
from /System/Library/Frameworks/Ruby.framework/Versions/2.0/usr/lib/ruby/2.0.0/rubygems/core_ext/kernel_require.rb:55:in 'require'
from /System/Library/Frameworks/Ruby.framework/Versions/2.0/usr/lib/ruby/2.0.0/rubygems/core_ext/kernel_require.rb:55:in 'require'
from /System/Library/Frameworks/Ruby.framework/Versions/2.0/usr/lib/ruby/2.0.0/net/https.rb:21:in '<top>'
from /System/Library/Frameworks/Ruby.framework/Versions/2.0/usr/lib/ruby/2.0.0/rubygems/core_ext/kernel_require.rb:55:in 'require'
from /System/Library/Frameworks/Ruby.framework/Versions/2.0/usr/lib/ruby/2.0.0/rubygems/core_ext/kernel_require.rb:55:in 'require'
from /usr/local/Library/Homebrew/utils.rb:308:in 'open'
from /usr/local/Library/Homebrew/utils.rb:350:in 'issues_matching' from /usr/local/Library/Homebrew/utils.rb:378:in 'issues_for_formula'
from /usr/local/Library/Homebrew/exceptions.rb:171:in 'fetch_issues' from /usr/local/Library/Homebrew/exceptions.rb:167:in 'issues'
from /usr/local/Library/Homebrew/exceptions.rb:207:in 'dump' from /usr/local/Library/brew.rb:158:in 'rescue in <main>'
from /usr/local/Library/brew.rb:66:in '<main>'</main></main></top></top></net></http>
Then you will need to edit the formula to set the path of your bzip2 binary manually. First, find where your bzip2 binary is located with the following command:
which bzip2Then edit the forumula for php:
brew edit php56and add this line:
args << "--with-bz2=/usr/bin/bzip2"after these lines:
def install_args args = superAnother common error that seems to be occuring, and has been reported (here) is a compilation error while building phar. The basic error is:
make: *** [ext/phar/phar.phar] Illegal instruction: 4or
/Library/Ruby/Site/2.0.0/rubygems/core_ext/kernel_require.rb:55:in require': Class is not a module (TypeError)I found this to be an error of trying to use Homebrew's OpenSSL, either by
setting it as the default on the system or using the --with-homebrew-ssl flag.
So for now my build is using the system version of OpenSSL. If the build goes
correctly then your total output should look something like this:
brew install php56 --homebrew-apxs --with-apache --with-homebrew-curl  --with-phpdbg --with-tidy
==> Installing dependencies for php56: curl, libpng, freetype, xz, gettex
==> Installing php56 dependency: curl
==> Downloading http://curl.haxx.se/download/curl-7.37.1.tar.gz
######################################################################## 100.0%
==> ./configure --prefix=/usr/local/Cellar/curl/7.37.1 --with-darwinssl --withou
==> make install
==> Caveats
This formula is keg-only, so it was not symlinked into /usr/local.

Mac OS X already provides this software and installing another version in
parallel can cause all kinds of trouble.

Generally there are no consequences of this for you. If you build your
own software and it requires this formula, you'll need to add to your
build variables:

    LDFLAGS:  -L/usr/local/opt/curl/lib
    CPPFLAGS: -I/usr/local/opt/curl/include

==> Summary
  /usr/local/Cellar/curl/7.37.1: 285 files, 2.8M, built in 91 seconds
==> Installing php56 dependency: libpng
==> Downloading https://downloads.sf.net/project/libpng/libpng16/1.6.12/libpng-1
######################################################################## 100.0%
==> ./configure --disable-silent-rules --prefix=/usr/local/Cellar/libpng/1.6.12
==> make install
  /usr/local/Cellar/libpng/1.6.12: 17 files, 1.2M, built in 24 seconds
==> Installing php56 dependency: freetype
==> Downloading https://downloads.sf.net/project/freetype/freetype2/2.5.3/freety
######################################################################## 100.0%
==> ./configure --prefix=/usr/local/Cellar/freetype/2.5.3_1 --without-harfbuzz
==> make
==> make install
  /usr/local/Cellar/freetype/2.5.3_1: 60 files, 2.5M, built in 26 seconds
==> Installing php56 dependency: xz
==> Downloading http://fossies.org/linux/misc/xz-5.0.5.tar.gz
######################################################################## 100.0%
==> ./configure --prefix=/usr/local/Cellar/xz/5.0.5
==> make install
  /usr/local/Cellar/xz/5.0.5: 58 files, 1.5M, built in 34 seconds
==> Installing php56 dependency: gettext
==> Downloading http://ftpmirror.gnu.org/gettext/gettext-0.19.2.tar.xz
######################################################################## 100.0%
==> ./configure --prefix=/usr/local/Cellar/gettext/0.19.2 --with-included-gettex
==> make
==> make install
==> Caveats
This formula is keg-only, so it was not symlinked into /usr/local.

OS X provides the BSD gettext library and some software gets confused if both are in the library path.

Generally there are no consequences of this for you. If you build your
own software and it requires this formula, you'll need to add to your
build variables:

    LDFLAGS:  -L/usr/local/opt/gettext/lib
    CPPFLAGS: -I/usr/local/opt/gettext/include

==> Summary
  /usr/local/Cellar/gettext/0.19.2: 1920 files, 18M, built in 5.3 minutes
==> Installing php56 dependency: jpeg
==> Downloading http://www.ijg.org/files/jpegsrc.v8d.tar.gz
######################################################################## 100.0%
==> ./configure --prefix=/usr/local/Cellar/jpeg/8d
==> make install
  /usr/local/Cellar/jpeg/8d: 18 files, 780K, built in 21 seconds
==> Installing php56 dependency: autoconf
==> Downloading http://ftpmirror.gnu.org/autoconf/autoconf-2.69.tar.gz
######################################################################## 100.0%
==> ./configure --prefix=/usr/local/Cellar/autoconf/2.69
==> make install
  /usr/local/Cellar/autoconf/2.69: 70 files, 3.1M, built in 28 seconds
==> Installing php56 dependency: automake
==> Downloading http://ftpmirror.gnu.org/automake/automake-1.14.1.tar.gz
######################################################################## 100.0%
==> ./configure --prefix=/usr/local/Cellar/automake/1.14.1
==> make install
  /usr/local/Cellar/automake/1.14.1: 131 files, 3.2M, built in 37 seconds
==> Installing php56 dependency: libtool
==> Downloading http://ftpmirror.gnu.org/libtool/libtool-2.4.2.tar.gz
######################################################################## 100.0%
==> Patching
patching file libltdl/config/ltmain.sh
==> ./configure --prefix=/usr/local/Cellar/libtool/2.4.2 --program-prefix=g --en
==> make install
==> Caveats
In order to prevent conflicts with Apple's own libtool we have prepended a "g"
so, you have instead: glibtool and glibtoolize.
==> Summary
  /usr/local/Cellar/libtool/2.4.2: 69 files, 2.5M, built in 46 seconds
==> Installing php56 dependency: homebrew/dupes/tidy
==> Downloading ftp://mirror.internode.on.net/pub/gentoo/distfiles/tidy-20090325
######################################################################## 100.0%
==> sh build/gnuauto/setup.sh
==> ./configure --prefix=/usr/local/Cellar/tidy/20090325 --mandir=/usr/local/Cel
==> make install
  /usr/local/Cellar/tidy/20090325: 10 files, 940K, built in 43 seconds
==> Installing php56 dependency: unixodbc
==> Downloading http://www.unixodbc.org/unixODBC-2.3.2.tar.gz
######################################################################## 100.0%
==> ./configure --prefix=/usr/local/Cellar/unixodbc/2.3.2 --enable-gui=no
==> make install
  /usr/local/Cellar/unixodbc/2.3.2: 31 files, 960K, built in 2.4 minutes
==> Installing php56
==> Downloading http://downloads.php.net/tyrael/php-5.6.0RC3.tar.bz2
######################################################################## 100.0%

Warning: Backing up all known pear.conf and .pearrc files
Warning: If you have a pre-existing pear install outside
         of homebrew-php, or you are using a non-standard
         pear.conf location, installation may fail.
==> ./configure --prefix=/usr/local/Cellar/php56/5.6.0-rc.3 --localstatedir=/usr
==> make
==> make install
==> /usr/local/Cellar/php56/5.6.0-rc.3/bin/pear config-set php_ini /usr/local/et
==> Caveats
To enable PHP in Apache add the following to httpd.conf and restart Apache:
    LoadModule php5_module    /usr/local/opt/php56/libexec/apache2/libphp5.so

The php.ini file can be found in:
    /usr/local/etc/php/5.6/php.ini

✩✩✩✩ PEAR ✩✩✩✩

If PEAR complains about permissions, 'fix' the default PEAR permissions and config:
    chmod -R ug+w /usr/local/Cellar/php56/5.6.0-rc.3/lib/php
    pear config-set php_ini /usr/local/etc/php/5.6/php.ini

✩✩✩✩ Extensions ✩✩✩✩

If you are having issues with custom extension compiling, ensure that
you are using the brew version, by placing /usr/local/bin before /usr/sbin in your PATH:

      PATH="/usr/local/bin:$PATH"

PHP56 Extensions will always be compiled against this PHP. Please install them
using --without-homebrew-php to enable compiling against system PHP.

✩✩✩✩ PHP CLI ✩✩✩✩

If you wish to swap the PHP you use on the command line, you should add the following to ~/.bashrc,
~/.zshrc, ~/.profile or your shell's equivalent configuration file:

      export PATH="$(brew --prefix homebrew/php/php56)/bin:$PATH"

To have launchd start php56 at login:
    ln -sfv /usr/local/opt/php56/*.plist ~/Library/LaunchAgents
Then to load php56 now:
    launchctl load ~/Library/LaunchAgents/homebrew.mxcl.php56.plist
==> Summary
  /usr/local/Cellar/php56/5.6.0-rc.3: 497 files, 50M, built in 5.9 minutes
As you can see looking at the caveats there are still a few steps we need to do. First we will fix the PEAR permissions, this might not be necessary, but it won't hurt anything so go ahead and copy and paste these commands into the terminal:
chmod -R ug+w /usr/local/Cellar/php56/5.6.0-rc.3/lib/php
pear config-set php_ini /usr/local/etc/php/5.6/php.ini
Next we'll make sure that PHP gets loaded at login by the launchd and load it now, too:
ln -sfv /usr/local/opt/php56/*.plist ~/Library/LaunchAgents
launchctl load ~/Library/LaunchAgents/homebrew.mxcl.php56.plist
Then we'll check our command line version. First, exit or Quit Terminal and reopen it, then run this command in terminal:
php -vThe output should have 5.6 listed as the version, like this:
php -v
PHP 5.6.0RC3 (cli) (built: Aug 7 2014 10:21:55)
Copyright (c) 1997-2014 The PHP Group
Zend Engine v2.6.0-dev, Copyright (c) 1998-2014 Zend Technologies
If it lists 5.5 as the version then you need to update you $PATH variable.
Depending on the version of shell your're running you need to add the following
line to your terminal config (default ~/.profile). The following commands should
add it for you:
touch ~/.profile
cat >> ~/.profile <<EOF
export PATH="$(brew --prefix homebrew/php/php56)/bin:$PATH"
EOF
Now you can exit Terminal and reopen it and run php -v again.
Finally you need to add the php handlers to the httpd.conf. Open up
/usr/local/etc/apache2/2.4/httpd.conf and add the following three lines to the
document:
LoadModule php5_module /usr/local/opt/php56/libexec/apache2/libphp5.so
AddHandler php5-script .php
AddType text/html .php
and find the line that starts with DirectoryIndex and change it to read:
DirectoryIndex index.phpSave the document and then restart the httpd service with the following command:
sudo httpd -k restartNow we having functioning PHP on our server, but remember we need to install
intl separately, so go back to terminal and run the following command:
brew install php56-intlWhen it finishes building you should have output similar to this:
brew install php56-intl
==> Installing php56-intl dependency: icu4c
==> Downloading http://download.icu-project.org/files/icu4c/52.1/icu4c-52_1-src.
######################################################################## 100.0%
==> ./configure --prefix=/usr/local/Cellar/icu4c/52.1 --disable-samples --disabl
==> make VERBOSE=1
==> make VERBOSE=1 install
==> Caveats
This formula is keg-only, so it was not symlinked into /usr/local.

Conflicts; see: https://github.com/Homebrew/homebrew/issues/issue/167

Generally there are no consequences of this for you. If you build your
own software and it requires this formula, you'll need to add to your
build variables:

    LDFLAGS:  -L/usr/local/opt/icu4c/lib
    CPPFLAGS: -I/usr/local/opt/icu4c/include

==> Summary
  /usr/local/Cellar/icu4c/52.1: 239 files, 60M, built in 2.6 minutes
==> Installing php56-intl
==> Downloading http://downloads.php.net/tyrael/php-5.6.0RC3.tar.bz2
######################################################################## 100.0%
==> PHP_AUTOCONF="/usr/local/opt/autoconf/bin/autoconf" PHP_AUTOHEADER="/usr/loc
==> ./configure --prefix=/usr/local/Cellar/php56-intl/5.6.0-rc.3 --with-php-conf
==> make
==> Caveats
To finish installing intl for PHP 5.6:
  * /usr/local/etc/php/5.6/conf.d/ext-intl.ini was created,
    do not forget to remove it upon extension removal.
  * Validate installation via one of the following methods:
  *
  * Using PHP from a webserver:
  * - Restart your webserver.
  * - Write a PHP page that calls "phpinfo();"
  * - Load it in a browser and look for the info on the intl module.
  * - If you see it, you have been successful!
  *
  * Using PHP from the command line:
  * - Run "php -i" (command-line "phpinfo()")
  * - Look for the info on the intl module.
  * - If you see it, you have been successful!
==> Summary
  /usr/local/Cellar/php56-intl/5.6.0-rc.3: 3 files, 360K, built in 52 seconds

brew install composer
==> Downloading http://getcomposer.org/download/1.0.0-alpha8/composer.phar
######################################################################## 100.0%
==> Caveats
Verify your installation by running:
  "composer --version".

You can read more about composer and packagist by running:
  "brew home composer".
==> Summary
  /usr/local/Cellar/composer/1.0.0-alpha8: 3 files, 952K, built in 3 seconds
And there we have it! That will give us every required Moodle php extension,
except for opcache, which at the time of this writing is
not compatible with PHP 5.6.
When it does become available you can simply run brew install php56-opcache
and you're done.
Wrapping Up
That's the end of the first part of this extensive walk through of setting up a Moodle development server. This first part should really help anyone doing any sort of PHP development on a Mac whether it's WordPress, Drupal, or whatever. In part two we'll dive into configuring Apache and MySQL for Moodle development as well how to use the MDK, git, and JIRA to contribute your code and bug fixes back to the community.